

If Google redirects to Bing every time you enter a search query, it usually means your computer has been compromised.
In most cases, you may be dealing with a browser hijacker which has found its way in your computer through a browser extension or a potentially unwanted application (PUA). It may seem harmless, but it often collects your personal information and then sells it to marketers.
There are multiple ways you can fix the Bing redirect virus. One of the best solutions is to use an antivirus software to get rid of the program or extension that’s behind the virus. There are very few steps involved in the process, and we’ve explained them below.
 Fixing the Google Redirect to Bing in 5 Easy Steps
- First, download and install an antivirus on your computer.
- We recommend TotalAV Antivirus Pro, which you can currently get for $19/year.
- Use the antivirus to run a full scan of your computer.
- Delete all files that are flagged as malware to stop Google from redirecting you to Bing.
- Start using Google without worrying about viruses!
Why does Google keep switching to Bing?
Google switches to Bing when there’s a virus on your computer that keeps redirecting you to it. Google wouldn’t intentionally redirect you to Bing, so your device has likely been infected with a virus. This type of virus is called a browser hijacker.
It typically happens in Google Chrome if you’ve assigned Google as the main search engine. When you type anything in the URL bar, it’s supposed to show you results from Google, but instead, it redirects you to Bing or some other search engine.
Of course, no one installs hijackers intentionally. They’re usually packaged with other apps or browser extensions and it’s easy to not notice them.
To help you remove these browser hijackers and get your search engine back to Google, we have a few guides that might be useful:
- Check out our guide on how to remove the Search Marquis on Mac.
- If you're facing Yahoo Search issues on Chrome, here's a step-by-step guide on how to remove Yahoo Search from Chrome.
- For those dealing with Apple Security Alert scams, we have instructions on how to remove Apple Security Alert scams.
- If you've encountered the Geek Squad scam, we've also got a guide on how to remove the Geek Squad scam.
What are browser hijackers?
A browser hijacker is a type of virus that alters your browser’s settings without your authorization and changes the default home page or search engine. Because of this, you end up seeing search results from Bing or some other search engine instead of Google.
The virus steals personal information such as your history, search queries, IP address, and other browsing activities. It sells all this information to advertisers and marketers, who then show you personalized ads.
This type of virus is most commonly found in files downloaded from unverified sources and torrenting sites. It’s always best to read reviews and verify the legitimacy of the site you’re downloading from to make sure it’s not infected with viruses.
Browser hijackers are usually not a cause for concern, but depending on who’s behind them, your personal information could be used for malicious reasons.
Here’s a quick summary of what browser hijackers are:
|
Virus name |
Bing redirect virus |
|
Virus type |
Browser hijacker |
|
Source |
Browser extensions, unverified sources, torrent sites, potentially unwanted applications (PUAs) |
|
Devices affected |
Mostly Google Chrome on Mac but can affect browsers on Windows as well |
|
Signs |
Google always redirects to Bing, computer may slow down sometimes, shows intrusive ads |
|
What it does |
Steals personal information, tracks your online activities, sells your data to advertisers |
|
How to remove it |
Use an antivirus software, delete browser extensions, remove suspicious programs |
How to remove Google redirect to Bing?
You have to remove the program or extension that’s causing Google to redirect to Bing. Here are some of the best methods you can use to do that:
1. Delete browser extensions
Browser extensions are almost always behind the Bing redirect virus. It’s common to accidentally install malicious extensions on Google Chrome and then forget about them. These extensions often don’t serve any purpose and are only there to steal your information.
Here’s how you can delete or disable them:
- Open Google Chrome and click on the three vertical dots in the top-right corner.
- Go to More tools > Extensions.
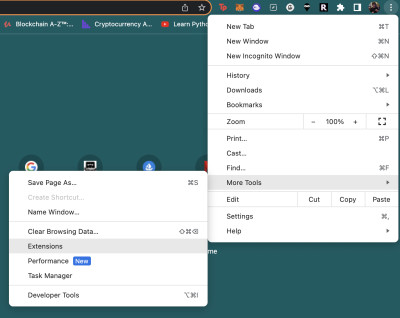
- In this section, you’ll be able to see all the extensions that are installed on your browser.
- You have to find extensions that look suspicious. Your judgment will be your best tool here.
- Once you’ve identified extensions that look suspicious, click on Remove.

- To disable an extension, click on the toggle beneath it. This may not always stop Google from redirecting you to Bing, though, which is why we recommend deleting the extension altogether.


2. Reset your browser
If you’re having a hard time identifying suspicious extensions, then it’s time to reset your browser’s settings.
This is a good alternative if deleting extensions doesn’t help. Keep in mind that resetting your browser’s settings won’t delete your history and saved passwords. It’ll disable browser extensions, remove cookies, and reset a few other settings.
Here’s how you can do it:
- Launch Google Chrome and open the settings by clicking on the three vertical dots.
- Select Settings from the drop-down menu.
- Click on Reset settings in the sidebar.
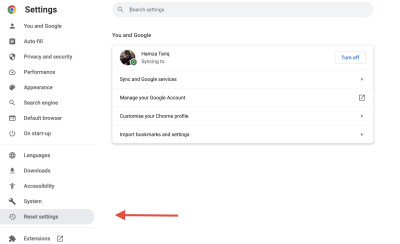
- Click on Restore settings to their original defaults.
- A popup box will appear, asking you to confirm if you want to reset everything. Click on Reset settings.

- Close the browser and open it again. You’ll be able to use Google as your default search engine now.


3. Delete malicious files and applications
If resetting your browser’s settings doesn’t do the trick, then it’s time to start deleting suspicious applications. You may have accidentally downloaded a malicious program which is causing Google to redirect to Bing.
This could also happen if you frequently use torrent sites or download third-party applications from unverified sources. In most cases, you’ll find such files in the “Library” folder on your Mac.
Here’s how you can remove infected files:
- Open the Finder application and in the menu bar, go to Go > Go to Folder.
- Type “/Library” and hit the Enter key on your keyboard.

- Now locate the “LaunchAgents” folder. Delete any suspicious file you find in the LaunchAgents folder. These files often have names like “installmac.AppRemoval.plist” and “myppes.download.plist.”

- Now go back and open the “LaunchDaemons” folder, and search for suspicious files and delete them.
- The third folder you need to check is “Application Support.”
- Open the folder and delete any suspicious folder you see inside it. It’s difficult to say what it may look like, but generally, if you see anything that you haven’t installed or downloaded yourself, then it’s most likely a virus.


4. Scan your device using an antivirus
An antivirus will perform a more comprehensive scan of your system and remove any unwanted programs that may be causing Google to redirect you to Bing.
We recommend getting TotalAV as it’s one of the most powerful security tools and it ranked #1 on our list of best antivirus software of 2026.
Here’s how you can use the antivirus to protect yourself from browser hijackers:
- Download the antivirus from its official site. We recommend TotalAV.
- Run an initial scan which can take up to an hour.
- Once it’s finished scanning and shows you all the suspicious and unnecessary applications it’s found, you can easily delete all of them.
- After the initial scan, you can run a “System Scan” whenever you want. This type of scan is capable of finding viruses 99% of the time.

We recommend giving our TotalAV review a read so you can learn more about its features and how you can use them to get rid of viruses from your computer.
How to prevent future browser hijackers?
Here are some tips on how you can prevent browser hijackers from infecting your computer in the future:
- Avoid downloading unnecessary extensions – Don’t download browser extensions you don’t need. When you do download them, always read their reviews first and see what other people have to say about them.
- Don’t download from unverified sources – If you frequently download third-party applications or torrents, then always make sure you use sites that are verified and popular. Read reviews of the files you’re downloading to make sure they don’t contain any viruses.
- Install an antivirus – TotalAV comes with real-time protection, which means it looks for malware and other types of viruses. It actively monitors apps and files you download and makes sure they’re not infected.
- Keep your browser updated – Always install the latest security updates for your browser so it remains secure.
Frequently asked questions
A browser hijacker can infiltrate your computer via a browser extension or a third-party program downloaded from an unverified source. Always read reviews of extensions or apps you download to make sure they’re not infected.
TotalAV is the best antivirus to remove Google redirect to Bing virus. It has many different powerful security features which will keep your computer safe from browser hijackers and other types of viruses.
If your Chrome browser keeps defaulting to Bing, it’s because your computer has been infected with a virus called browser hijacker. You may have accidentally installed it by downloading a browser extension or an app from a suspicious site.